Using GarageBand to make professional hypnosis & guided meditation audio products
With GarageBand it is possible to make hypnosis & guided meditation downloads, CDs & video soundtracks that are great resources to share with clients or to sell through your website or via on-line stores like iTunes & Amazon. Recording is easy using the built-in applications that come with every Mac, and the whole process of recording, mixing and exporting the finished product is un-complicated and can achieve very high quality results.
Starting to record with GarageBand
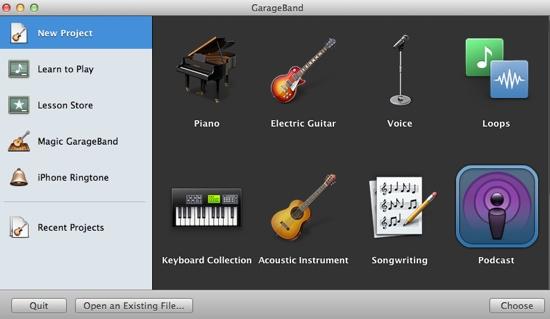
Locate and open GarageBand & when prompted create a new project choosing either Podcast or Voice as shown below..

Choose a name and location for your recording and click Create – You can remove any unwanted tracks by holding down Command and clicking Delete to remove them. The GarageBand window should now look like this:

To set the input source for an external microphone double-click the header of the track you want to record to open the Track Info window.

Choose one of the following from the Input Source Menu: To use a microphone connected to a USB port – choose the microphone from the menu. To use a microphone connected to your computer’s audio input – choose Built-in Input. To use your computer’s built-in microphone – choose Built-in Microphone. You can then use the Recording Level slider to change the input volume level for the mic & you’re ready to record – Just press the big red record button at the bottom of the GarageBand window:

It is not a problem if you make a mistake whilst recording, just go back to the beginning of the sentence or paragraph – you can edit the recording later on. When you’ve finished, hit the red button again to stop recording and you should see the audio wave form in the main window – use the play, rewind & stop controls at the bottom to play back and listen to your recording
Quick tips..
Make sure that the room where you record is quiet and free from background noise such as fridges or traffic rumble. The better the microphone the better quality the recording. Using a good quality external microphone rather than the built-in mic or a headset will help reduce unwanted noise & give warmer, more balanced voice recordings.
Adding background music
You have finished recording your voice and are ready to add background music to your project.. Locate your the track you want to use on your computer and drag it into the GarageBand window – the new orange track will be ready to edit – use the track volume slider to balance the background music with your voice recordings.

Editing your project
To crop the audio – click the mouse on the displayed audio and drag left or right to select the section that you want to use then double click to confirm the new selection. You can also select unwanted sections and remove with the delete key. You can use the Cut & Paste comands in all the usual ways. You can also add sound effects – In the right hand panel of GarageBand, click on the Loop Browser icon (the eye icon) to view and listen to the sound effects. GarageBand can do many things and it’s worth experimenting to try out other features.

Exporting from GarageBand
Once your recording has been edited you will be ready to export it: From the Share menu, select Export Song to Disk

Choose the desired output (encoding) settings – this will depend on the length and format of the finished product. In general it is best to choose the highest quality output for any specific purpose – but remember that uncompressed files for long recordings can be very large. Click Export to finish the process and choose a filename. Your new recording will be ready to go!


Leave a Reply
Want to join the discussion?Feel free to contribute!